Introduction
Here is some information for getting the most out of timestream. How to manipulate timelines
How to create a timeline
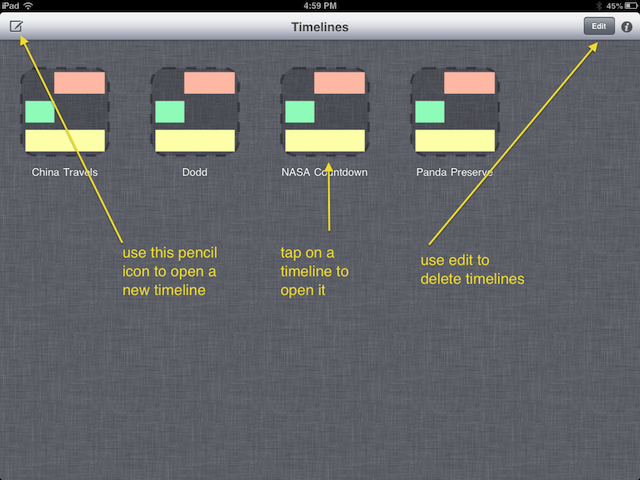
When you open up your Timestream app, you will see a blank page with a small square with a pencil in the upper left hand top banner. Tap on that icon, and a new window “Create timeline” will open up.
How to open a timeline
Tap on the timeline you want to open.
How to delete a timeline
If you are within a timeline, tap the “Timelines” button in the right header. This will take you back to the main page that lists all your timelines. In the top left, you will see a button that says “Edit.” Tap that button (it will turn into a "Done" button) and each timeline will show a red delete icon on the corner of the timeline. Tap the red icon for the timeline you wish to delete. You will get a pop-up window that says “Delete this timeline permanently?" Tap "Delete" in the pop-up window to delete, or the "Done" button to cancel. Tap the "Done" button when you are finished deleting timelines. This will take you back the view that shows all your created timelines.
How to choose your timeline options

How to pick your units: A very important thing to consider is what period of time you want your timeline to cover. The options are:
- Billions of years
- Millions of years
- Thousands of years
- Years
- Year, month, and day
- Year month, day and time
- Time
- Use time unit
This is important, because once the unit choice is made, it can’t be changed. We can use "Billions of years", good for galactic time—the universe is believed to be about 13 billion years old. "Millions of years" we can use for geologic time, since the earth is believed to be a little over 4 billion years old, or 4,000 million years. "Thousands of years" will allow us to build a timeline for human civilization. "Years", "Year, month and day", and "Year, month, day and time" are good for personal or historic timelines. All these options allow you to add both past and future events. The "Time" option allows us to use a 12 or 24 hour clock, while the "Use time unit" option allows us to switch to relative time, pick the unit we want to use and look back or forward.
Years can go from 9999 BCE (Before the Common Era, another name for BC) to 9999 CE (Common Era, another name for AD). This option only allows for dating an event to a year. If you want to date events within a year, then you will need the option "Year, month and day".
"Year, month and day" adds the option to choose a specific month and day within the year. The range is still 9999 BCE to 9999 CE.
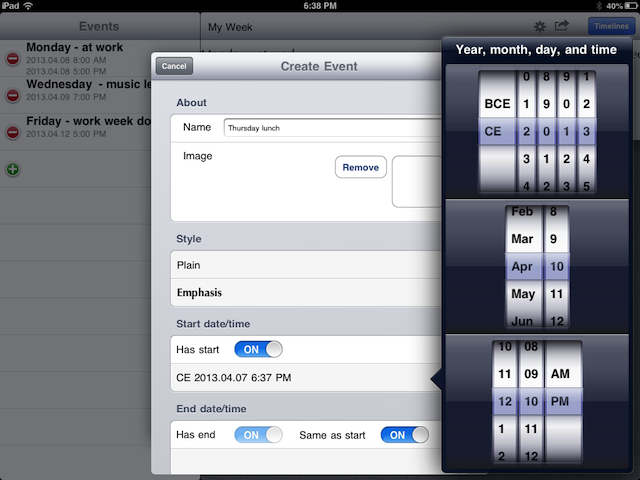
"Year, month, day and time" ( 9999 BCE to 9999 CE) adds the option to choose a specific time in a day (such as the time of day you were born, for example). With time, you can choose either 24-hour time, or AM PM. Remember, once you choose one of these options, it cannot be changed.
The "Time" option is for events that all fall within one day. This option allows you to use 24-hour time, and to use seconds. These options, once chosen, cannot be changed.
The last option, the "Use time unit", allows you to pick the unit (such as seconds, years, decades) that you want. You can create events that go from 9999.9 units back, to 9999.9 units forward. You might want to use this option when creating a count-down type timeline, or laying out a plot timeline, where, for example, a detective might find the first lead three hours from when the kidnapping took place.
Appearance Options
Show start and end times
If you are entering events that have a duration, that is they begin and end at different times, then you have the option to show start and end times on event labels. If you do not want to show start and end times, only the start time will be visible on your timeline.
Width for layout
Using the "Width for layout" option, you can decide if you want a very shallow timeline where you scroll to see the beginning and the end, or if you want a more condensed timeline where events are stacked on one another. If this isn’t clear to you, choose the default option - you can change this width as you build your timeline, and see how that changes the layout.
Timeline style
When you create your timeline, scroll down under the units section, and you will see eleven different timeline styles. Pick a style by tapping on it.
When you are done deciding on your options, tap the “Save” button on the top right of the pop-up window.
How to construct to your timeline
The best way to create your timeline is to enter the first event and the last event. This will enable you to see all of your timeline as you fill in other events.
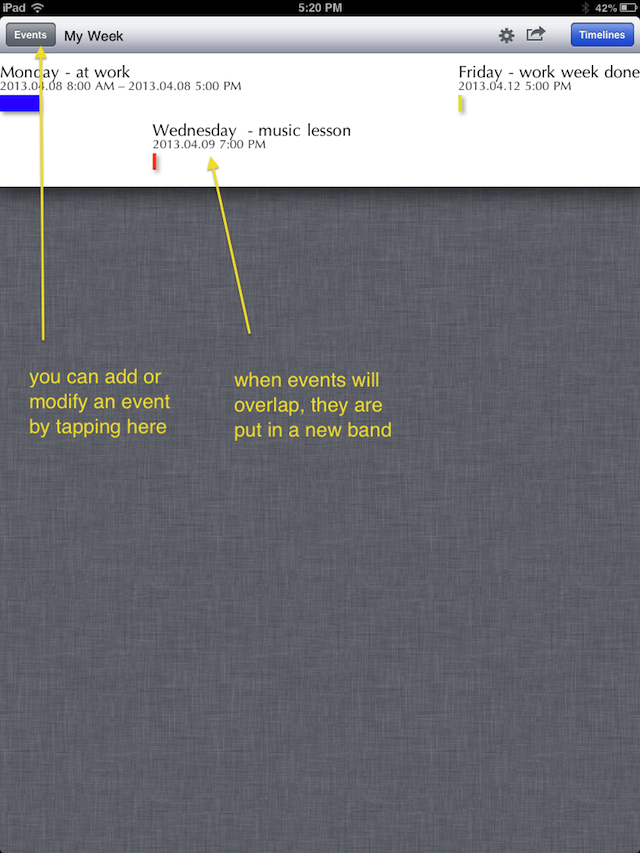
Events in a timeline are placed in bands on your timeline page. The program automatically picks what band to put the event in. One way you might be able to change which band your event appears in is to change the length of the event title. Shorter event titles might fit into a band that already contains some events, where a longer title would not.
How to change settings (appearance, width, etc.) for your timeline
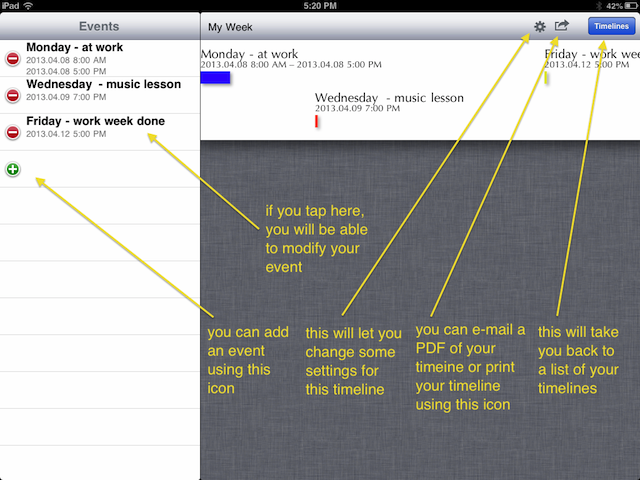
On the top right you will see a wheel, or cog. Tap on that, and a settings menu will open up. Save when you are done making changes.
How to add an event to your timeline
If your iPad is horizontal, you will have an event list on the left. If it is vertical, you will need to tap the “Events” button on the left to dropdown the event list. To add an event, tap on the green plus button. This will open a window where you can enter the event name, the event time, and denote whether the event has a duration.
How to add pictures
When you are entering an event, you will see a blank rectangle next to “Image” on the Create Event window. Tap on the rectangle, and a list of your stored photos collections will open up. Tap on the collection to see the individual photos, and then tap on the photo you want to include. (Be sure to use images you own or are legally licensed to use.)
If you have photos that are on your computer that you want to put on your iPad so you can create a timeline, you will need to follow these directions.
How to share your timeline
On the top right of your timeline you will see a container with an arrow pointing out. Tap on that icon. You will see two options: print and E-mail. If you select print, the iPad will look for an AirPrint printer. If you have a printer set up that the iPad can see, you can print to that printer. (To back out of the print option, tap the arrow icon again.) The second option is to e-mail your timeline as a PDF file. When you tap the E-mail option, a “new message” form will open up with the timeline already attached. If you want to use the PDF in other applications, you can e-mail the timeline to yourself.
How to back up your timelines
You can back up your timelines when you backup your iPad using iTunes.
How to save your timeline and reinstall it later on your iPad or on another iPad
Connect your iPad to computer and open iTunes. Go to the Apps button for your iPad. You will see a list of your installed apps. Scroll to the bottom, and you will see a File Sharing section, which lists which applications that can share files with your computer. Timestream will be listed, with a file folder for each timeline you created. You will need to indicate where you want the timelne folder to be saved to on your computer. You may want to create special file folder for it. (If you open the transferred file, you will see your images and a .plist file, which is the timeline file.) Since Timestream doesn’t run on either a Windows or Mac computer, you can’t manipulate this file on your computer.
To get your timeline back to your iPad (if you delete it), or to put it on someone else’s iPad, you will need to zip the file folder. On Windows, right click on the folder, click "Send To", then click "Compressed (zipped) Folder". On Mac, right click on the file folder, then click "Compress". Once the file is zipped, you can upload it to an iPad using the same File Sharing section. Use the add option. You will not see the new timeline until you close Timestream (not just exit the application). (See these instructions.) To transfer it to another iPad (Timestream must be installed), transfer the zip file to the other person’s computer. He or she can then use the add option in the File Sharing section of iTunes.
When you have problems
If timestream is not working correctly for you, please e-mail us, the Kosada team, at info@kosada.com and we will work with you to solve your problem.